JoyLau's Blog

JoyLau 的技术学习与思考

背景

有时在项目中调用的接口是 https 的形式, 这时使用 RestTemplate 来调用请求就会出错:

1
2
3
4
5
6
7
8
9
10
11
12
13
14
15
16
17
18
19
20
21
22
23
24
25
26
27
28
29
30
31
32
33
34
35
36
37
javax.net.ssl.SSLHandshakeException: sun.security.validator.ValidatorException: PKIX path building failed: sun.security.provider.certpath.SunCertPathBuilderException: unable to find valid certification path to requested target
at sun.security.ssl.Alerts.getSSLException(Alerts.java:192)
at sun.security.ssl.SSLSocketImpl.fatal(SSLSocketImpl.java:1949)
at sun.security.ssl.Handshaker.fatalSE(Handshaker.java:302)
at sun.security.ssl.Handshaker.fatalSE(Handshaker.java:296)
at sun.security.ssl.ClientHandshaker.serverCertificate(ClientHandshaker.java:1514)
at sun.security.ssl.ClientHandshaker.processMessage(ClientHandshaker.java:216)
at sun.security.ssl.Handshaker.processLoop(Handshaker.java:1026)
at sun.security.ssl.Handshaker.process_record(Handshaker.java:961)
at sun.security.ssl.SSLSocketImpl.readRecord(SSLSocketImpl.java:1062)
at sun.security.ssl.SSLSocketImpl.performInitialHandshake(SSLSocketImpl.java:1375)
at sun.security.ssl.SSLSocketImpl.startHandshake(SSLSocketImpl.java:1403)
at sun.security.ssl.SSLSocketImpl.startHandshake(SSLSocketImpl.java:1387)
at sun.net.www.protocol.https.HttpsClient.afterConnect(HttpsClient.java:559)
at sun.net.www.protocol.https.AbstractDelegateHttpsURLConnection.connect(AbstractDelegateHttpsURLConnection.java:185)
at sun.net.www.protocol.https.HttpsURLConnectionImpl.connect(HttpsURLConnectionImpl.java:153)
at cn.joylau.code.job.executor.service.jobhandler.HttpJobHandler.execute(HttpJobHandler.java:155)
at cn.joylau.code.job.core.thread.JobThread.run(JobThread.java:151)
Caused by: sun.security.validator.ValidatorException: PKIX path building failed: sun.security.provider.certpath.SunCertPathBuilderException: unable to find valid certification path to requested target
at sun.security.validator.PKIXValidator.doBuild(PKIXValidator.java:387)
at sun.security.validator.PKIXValidator.engineValidate(PKIXValidator.java:292)
at sun.security.validator.Validator.validate(Validator.java:260)
at sun.security.ssl.X509TrustManagerImpl.validate(X509TrustManagerImpl.java:324)
at sun.security.ssl.X509TrustManagerImpl.checkTrusted(X509TrustManagerImpl.java:229)
at sun.security.ssl.X509TrustManagerImpl.checkServerTrusted(X509TrustManagerImpl.java:124)
at sun.security.ssl.ClientHandshaker.serverCertificate(ClientHandshaker.java:1496)
... 12 more
Caused by: sun.security.provider.certpath.SunCertPathBuilderException: unable to find valid certification path to requested target
at sun.security.provider.certpath.SunCertPathBuilder.build(SunCertPathBuilder.java:141)
at sun.security.provider.certpath.SunCertPathBuilder.engineBuild(SunCertPathBuilder.java:126)
at java.security.cert.CertPathBuilder.build(CertPathBuilder.java:280)
at sun.security.validator.PKIXValidator.doBuild(PKIXValidator.java:382)
... 18 more


I/O error on GET request for "https://xxxxxx":
sun.security.validator.ValidatorException: PKIX path building failed: sun.security.provider.certpath.SunCertPathBuilderException: unable to find valid certification path to requested target; nested exception is javax.net.ssl.SSLHandshakeException: sun.security.validator.ValidatorException: PKIX path building failed: sun.security.provider.certpath.SunCertPathBuilderException: unable to find valid certification path to requested target

下面是解决方式

配置

  1. 引入依赖
1
implementation 'org.apache.httpcomponents:httpclient'
  1. 代码配置
1
2
3
4
5
6
7
8
9
10
11
12
13
14
15
16
17
18
19
20
21
22
23
24
25
26
27
28
29
30
31
32
33
34
    import org.apache.http.conn.ssl.NoopHostnameVerifier;
import org.apache.http.conn.ssl.SSLConnectionSocketFactory;
import org.apache.http.conn.ssl.TrustSelfSignedStrategy;
import org.apache.http.impl.client.CloseableHttpClient;
import org.apache.http.impl.client.HttpClients;
import org.apache.http.ssl.SSLContextBuilder;


@Bean
public RestTemplate restTemplate(){
return restTemplateBuilder.build();
}

/**
* HTTPS RestTemplate
*/
@Bean
public RestTemplate httpsRestTemplate() throws KeyStoreException, NoSuchAlgorithmException, KeyManagementException {
SSLContextBuilder builder = new SSLContextBuilder();
builder.loadTrustMaterial(null, new TrustSelfSignedStrategy());
SSLConnectionSocketFactory sslConnectionSocketFactory = new SSLConnectionSocketFactory(builder.build(), NoopHostnameVerifier.INSTANCE);

CloseableHttpClient httpClient
= HttpClients.custom()
.setSSLHostnameVerifier(new NoopHostnameVerifier())
.setSSLSocketFactory(sslConnectionSocketFactory)
// .setDefaultCredentialsProvider(credsProvider)
.build();
HttpComponentsClientHttpRequestFactory requestFactory
= new HttpComponentsClientHttpRequestFactory();
requestFactory.setHttpClient(httpClient);
requestFactory.setConnectTimeout((int)Duration.ofSeconds(5).toMillis());
return new RestTemplate(requestFactory);
}

使用

之前使用方式不变:

1
2
@Autowired
private RestTemplate restTemplate;

使用 https RestTemplate

1
2
@Autowired
private RestTemplate httpsRestTemplate;

背景

最近因为工作原因不得不在 Mac 上安装了 Office 套件

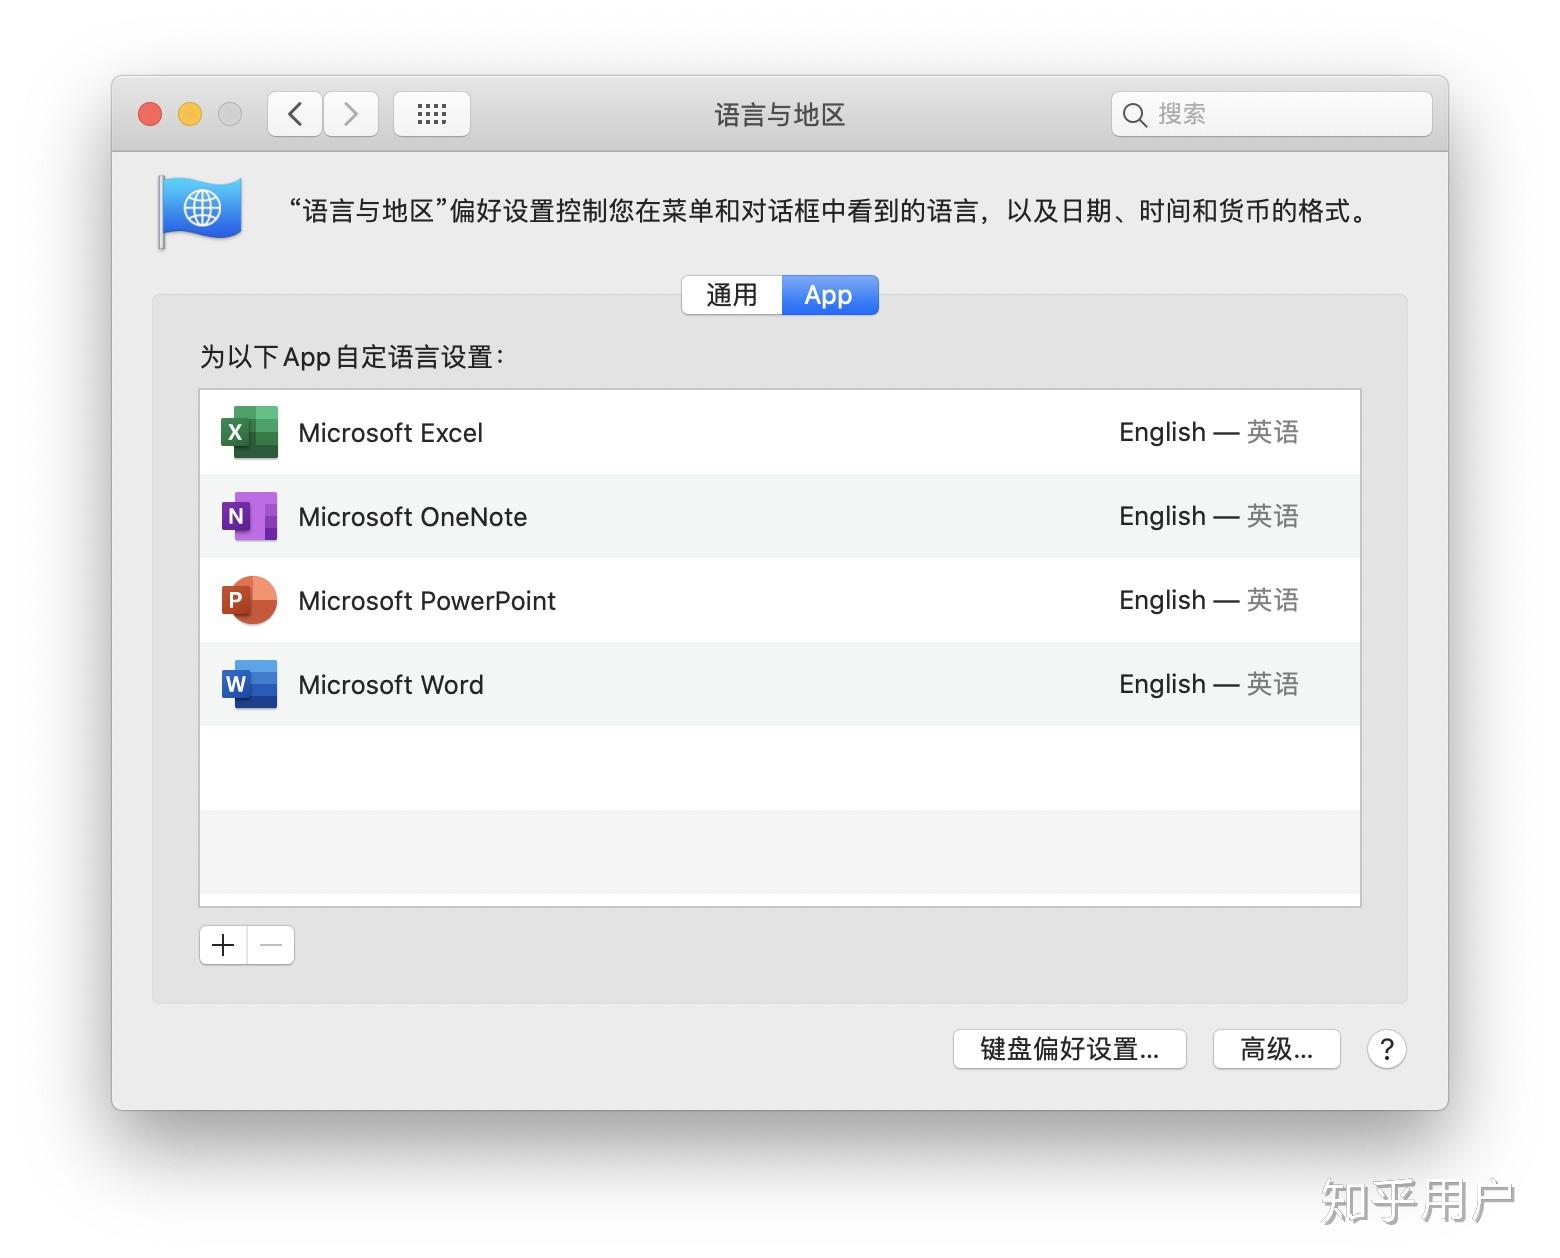
但是有一个问题, 我的 Mac 的系统语言是英文的, 安装完 Office 后, 整个操作都是英文的, 蒙蔽了….

解决

方式一

打开终端:

1
2
3
defaults write com.microsoft.Word AppleLanguages '("zh_CN")'
defaults write com.microsoft.Excel AppleLanguages '("zh_CN")'
defaults write com.microsoft.Powerpoint AppleLanguages '("zh_CN")'

切换回英文的话, 修改 zh_CH 为 en 即可

方式二

在系统设置里面修改特定APP的语言

IMage

注: 转自知乎

概述

在 CentOS 8 上安装 bpytop 很简单, 安装 epel 库后执行 dnf install bpytop 即可, 但是在 CentOS 7 的 epel 库里却没有这个 bpytop 包, 这里介绍如何在 CentOS 7 下安装 bpytop

步骤

  1. 安装 epel 库
1
yum install epel-release
  1. 安装 snapd 并启用 snapd 套接字
1
2
yum install snapd
systemctl enable --now snapd.socket
  1. 用户重新登录

  2. 安装及权限配置

1
2
3
4
5
6
7
8
9
10
11
12
13
snap install bpytop

sudo snap connect bpytop:mount-observe

sudo snap connect bpytop:network-control

sudo snap connect bpytop:hardware-observe

sudo snap connect bpytop:system-observe

sudo snap connect bpytop:process-control

sudo snap connect bpytop:physical-memory-observe

背景

很多时候我们通过 mount -t nfs -o nolock 服务端IP:共享目录绝对路径 本地挂载目录 来挂载网络磁盘

很多时候,为了安全考虑网络磁盘都设置了用户名密码

这时挂载的时候就需要设置用户名密码了

很可惜上述方式 nfs 没有找到设置用户名密码的参数

解决

使用 cifs

  1. 安装依赖: yum install cifs-utils

  2. 挂载: mount -t cifs -o username=USERNAME,password=PASSWORD,iocharset=utf8 //192.168.10.191/CM_Backup /mnt/191-nas

注意主机地址前的 // 不能省略

  1. 卸载挂载: umount /mnt/191-nas

额外的

挂载网络磁盘很多时候无非为了备份, 使用 cp 命令像本地拷贝文件一样备份即可,但是 cp 命令无法显示进度,对于大文件来说,就会等待上很长的时间无输出

我这里提供 2 中解决方式

  1. 使用 pv

语法: pv sourcefile > targetfile

优点: 提供实时进度条显示

缺点: 只能终端显示, 无法记录到文件中, 而且一旦终止任务, 进程无法正常退出

  1. 使用 rsync

语法: rsync -avPh sourcefile targetfile

优点: 使用命令 rsync -avPh sourcefile targetfile | tee log.log 可将进度写入日志文件中

缺点: 暂无

Termius 算是我比较喜欢的一款终端软件了, 因为它很漂亮, 自带的字体很好看, 软件本身是免费的, 但是如果要使用一些高级功能

比如不同操作系统下的 Termius 的软件配置同步则需要订阅他的高级功能, 收费不低, 关键还不是买断机制的, 是按年缴费

这不得不使我研究了一番

解决

经我研究, Termius 是使用 Electron 开发的, 挂不得它可以把界面做的这么好看

我本身也使用 Electron 开发过一些加壳软件, 知道软件的一些配置信息存储的技术手段

  1. 本地文件存储
  2. cookie 存储
  3. Local Storage 存储
  4. IndexedDB 存储

其中第二,第三的方式存储不太可能, 是一些简单的字符串存储, 容量小, 且数据结构简单

最终我定位了它使用的是 IndexedDB 存储

且存储的位置(Mac OS)在 /Users/joylau/Library/Containers/com.termius.mac/Data/Library/Application Support/Termius/IndexedDB/file__0.indexeddb.leveldb/000003.log

同理在 Windows 下或者 Linux 下找到该 indexedDB 数据文件, 再进行替换, 则软件的配置得以同步
背景

在 docker 官方问文档里查找关于 docker compose 3 关于资源限制的配置项
发现只能用于集群部署

解决方式

依然使用集群部署的配置方式:

1
2
3
4
5
6
7
8
redis:
image: redis:alpine
container_name: redis
deploy:
resources:
limits:
cpus: '0.50'
memory: 50M

这时启动时加入参数 --compatibility 即可

1
docker-compose --compatibility up -d

--compatibility: 以兼容模式运行, 将 v3 的语法转化为 v2 的语法, 而不需要将 compose 文件改为 v2 的版本

背景

有时我们在 gradle 里定义了一些属性, 想在 springboot 的 application 配置文件里使用, 这里介绍这种处理方式, 并且将配置应用于 springboot 的自定义 Banner 图中

步骤

  1. 配置 build.gradle

添加以下配置

1
2
3
4
5
processResources {
filesMatching('application.yml') {
expand(project.properties)
}
}

如果想将 gradle 的配置应用于所有 springboot 配置文件, 则直接使用

1
2
3
processResources {
expand(project.properties)
}
  1. 在 springboot 的配置文件里使用

比如我在 gradle.properties 里定义了如下配置:

1
2
3
4
5
6
7
author=JoyLau
email=2587038142.liu@gmail.com
projectArtifact=es-doc-office
projectGroup=cn.joylau.code
projectVersion=2.0.5
javaVersion=1.8

在 springboot 配置文件里应用:

1
2
3
4
5
6
info:
app:
name: ${projectArtifact}
author: ${author}
email: ${email}
version: ${projectVersion}

需要注意的是: ${} 是 springboot 里本身使用引入内置变量的方法, 如果使用上述方式, 则原来使用 springboot 内置的方式的话需要加上 \ 转义, 即使用 \${}

经过如上使用, springboot 应用会在编译期将配置文件转化并复制到了项目的 build/resources/main 目录下, 如果到该目录下查找配置文件, 则会发现文件里的属性已经被实际的值替换了

自定义属性配置到 Banner 图中

很多时候我们会自定义 banner 图, 使用 banner.txt 可以使用 springboot 的内置变量
结合上面的使用方法, 我给出我的使用示例
banner 的生成可以去这个在线网站: Online Spring Boot Banner Generator

SpringBoot-Gradle-Property-Expansion

1
2
3
4
5
6
7
8
9
10
11
,------.  ,---.           ,------.    ,-----.   ,-----.          ,-----.  ,------. ,------. ,--.  ,-----. ,------.
| .---' ' .-' | .-. \ ' .-. ' ' .--./ ' .-. ' | .---' | .---' | | ' .--./ | .---'
| `--, `. `-. | | \ : | | | | | | | | | | | `--, | `--, | | | | | `--,
| `---. .-' | | '--' / ' '-' ' ' '--'\ ' '-' ' | |` | |` | | ' '--'\ | `---.
`------' `-----' `-------' `-----' `-----' `-----' `--' `--' `--' `-----' `------'

Author :: ${info.app.author} (${info.app.email})
Boot Version :: ${spring-boot.version}
App Version :: ${info.app.version}


最终效果

1
2
3
4
5
6
7
8
9
10
11
12
13
14
15
16
17
18
19
20
21
22
23
24
25
26
27
28
29
30
,------.  ,---.           ,------.    ,-----.   ,-----.          ,-----.  ,------. ,------. ,--.  ,-----. ,------.
| .---' ' .-' | .-. \ ' .-. ' ' .--./ ' .-. ' | .---' | .---' | | ' .--./ | .---'
| `--, `. `-. | | \ : | | | | | | | | | | | `--, | `--, | | | | | `--,
| `---. .-' | | '--' / ' '-' ' ' '--'\ ' '-' ' | |` | |` | | ' '--'\ | `---.
`------' `-----' `-------' `-----' `-----' `-----' `--' `--' `--' `-----' `------'

Author :: JoyLau (2587038142.liu@gmail.com)
Boot Version :: 2.1.2.RELEASE
App Version :: 2.0.5

2020-09-01 16:15:25.967 INFO 51691 --- [ main] cn.joylau.code.EsDocOfficeApplication : Starting EsDocOfficeApplication on JoyLaudeMacBook-Pro.local with PID 51691 (/Users/joylau/dev/idea-project/dev-app/es-doc-office/es-doc-office-service/build/classes/java/main started by joylau in /Users/joylau/dev/idea-project/es-doc-office)
2020-09-01 16:15:25.969 INFO 51691 --- [ main] cn.joylau.code.EsDocOfficeApplication : The following profiles are active: db,dev
2020-09-01 16:15:27.130 INFO 51691 --- [ main] .s.d.r.c.RepositoryConfigurationDelegate : Bootstrapping Spring Data repositories in DEFAULT mode.
2020-09-01 16:15:27.231 INFO 51691 --- [ main] .s.d.r.c.RepositoryConfigurationDelegate : Finished Spring Data repository scanning in 95ms. Found 3 repository interfaces.
2020-09-01 16:15:27.643 INFO 51691 --- [ main] trationDelegate$BeanPostProcessorChecker : Bean 'org.springframework.transaction.annotation.ProxyTransactionManagementConfiguration' of type [org.springframework.transaction.annotation.ProxyTransactionManagementConfiguration$$EnhancerBySpringCGLIB$$54a92264] is not eligible for getting processed by all BeanPostProcessors (for example: not eligible for auto-proxying)
2020-09-01 16:15:27.922 WARN 51691 --- [ main] io.undertow.websockets.jsr : UT026010: Buffer pool was not set on WebSocketDeploymentInfo, the default pool will be used
2020-09-01 16:15:27.958 INFO 51691 --- [ main] io.undertow.servlet : Initializing Spring embedded WebApplicationContext
2020-09-01 16:15:27.959 INFO 51691 --- [ main] o.s.web.context.ContextLoader : Root WebApplicationContext: initialization completed in 1933 ms
2020-09-01 16:15:28.242 INFO 51691 --- [ main] c.a.d.s.b.a.DruidDataSourceAutoConfigure : Init DruidDataSource
2020-09-01 16:15:28.381 INFO 51691 --- [ main] com.alibaba.druid.pool.DruidDataSource : {dataSource-1} inited
2020-09-01 16:15:28.659 INFO 51691 --- [ main] o.elasticsearch.plugins.PluginsService : no modules loaded
2020-09-01 16:15:28.660 INFO 51691 --- [ main] o.elasticsearch.plugins.PluginsService : loaded plugin [org.elasticsearch.index.reindex.ReindexPlugin]
2020-09-01 16:15:28.660 INFO 51691 --- [ main] o.elasticsearch.plugins.PluginsService : loaded plugin [org.elasticsearch.join.ParentJoinPlugin]
2020-09-01 16:15:28.660 INFO 51691 --- [ main] o.elasticsearch.plugins.PluginsService : loaded plugin [org.elasticsearch.percolator.PercolatorPlugin]
2020-09-01 16:15:28.660 INFO 51691 --- [ main] o.elasticsearch.plugins.PluginsService : loaded plugin [org.elasticsearch.script.mustache.MustachePlugin]
2020-09-01 16:15:28.660 INFO 51691 --- [ main] o.elasticsearch.plugins.PluginsService : loaded plugin [org.elasticsearch.transport.Netty4Plugin]
..........


背景

继上一篇文章 【indicator-sysmonitor 状态栏监控工具开启对磁盘读写的监控】,这里我想让监控的数据放到状态栏的最左侧, 可发现事情并不简单。。。

因为 Ubuntu 下并不像 Mac 下按住 option 键可随意拖动

解决方式

1
sudo vim /usr/share/indicator-application/ordering-override.keyfile

修改顺序, 数字越小越靠左

修改完毕使用 restart unity-panel-service 重启生效

但发现修改完后顺序并没有改变

这个时候需要结合状态栏实际已有的托盘图标来操作顺序

获取状态栏图标的脚本:

1
2
3
4
5
6
7
8
9
10
11
12
13
#!/bin/sh

dbus-send --type=method_call --print-reply --dest=com.canonical.indicator.application /com/canonical/indicator/application/service com.canonical.indicator.application.service.GetApplications | grep "string" > /tmp/indicators.txt

c=$(wc -l < /tmp/indicators.txt)
i=$((c / 8))
s=6

while [ "$i" != "0" ]; do
echo $(awk -v n=$s '/string/ && !--n {getline; print; exit}' /tmp/indicators.txt)
s=$(( $s + 8 ))
i=$(( $i - 1 ))
done

执行这个脚本获取图标的程序名称, 再修改 ordering-override.keyfile 的顺序, restart unity-panel-service 重启生效

缺点

按照上述方式操作后, 顺序得以改变, 但是如果后续打开了新的程序有托盘图标, 则新程序的图标会在最左边

0%